The 1 Dumbbell Workout
Share
One dumbbell + seven exercises = one easy workout. Mark Laws shows you how you can lift big with just one bit of equipment
There are three things that are very precious commodities within gyms – time, space and results. They are more precious than usual at this time of year thanks to all the New Year’s resolutions that everyone has made.
Well, have a try of my soon-to-be world famous ‘one dumbbell workout’.
All you need is one single dumbbell and enough room to swing a cat. If there are no feline friends around, then a 1.5m square will be fine.
There are seven exercises to perform during this workout. You will start off with the simplest exercise and gradually increase the complexity. At the same time the number of repetitions will be reducing as the complexity of the exercise increases.
To begin with you will need to use a very light weight, roughly 10-15% of your bodyweight. The first few levels may feel very easy but as the complexity increases that will soon change.
The aim of the workout is to be able to perform the entire thing with just one single dumbbell, and to gradually make that dumbbell as heavy as possible.
Oh, and the benchmark is to be able to perform the entire workout as quickly as possible with one dumbbell that is 50% of your bodyweight (eg, an 85kg person would be using a 42.5kg DB).
Stage one – Deadlift, 14 reps each hand
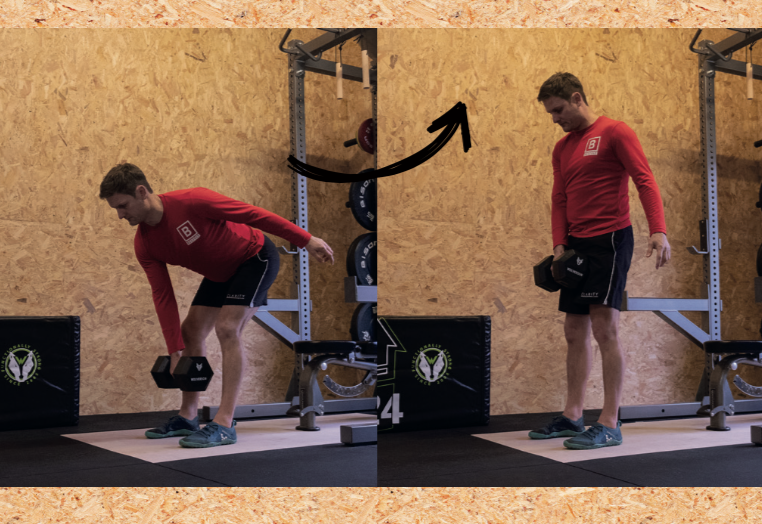
Start with the DB at the top of the deadlift, resting in front of your thighs with your legs straight. Unlock the knees ever so slightly but do not then change the angle of the knee throughout. Move your shoulders back and imagine your torso from (hip to shoulder) is set in concrete and cannot move. Then push your backside back towards the wall, as if trying to press a button with your buttocks, by hinging at the hip. As your hips move backwards your torso will lean forwards and the DB will lower down towards the floor. Make sure the DB stays in contact with your legs all the way up and down. Don’t go any deeper than you can manage without rounding through your back or shoulders.
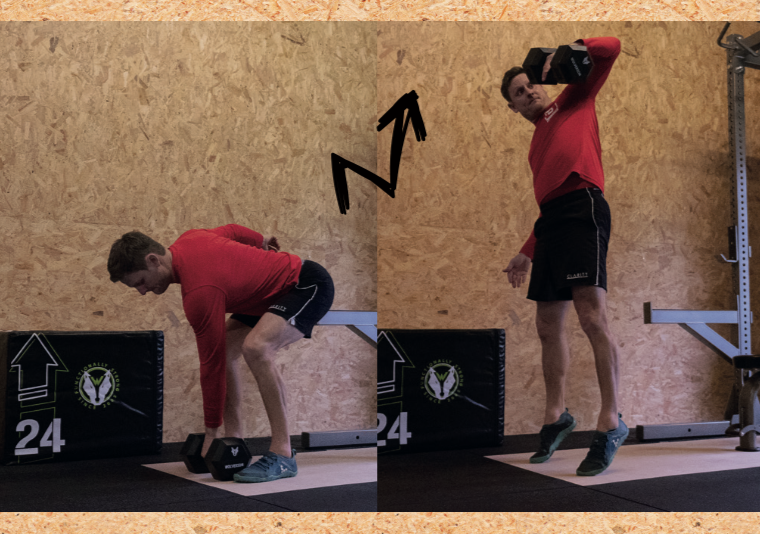
Stage two – High Pull, 12 reps each hand
This is a slight development from the deadlift, so as you get to the bottom of the deadlift position you should then bend at the knee until the DB is resting on the floor – this will then be your start position. Ensure that your shoulders are pulled back and that your back stays ‘flat’ as you move into this start position. This is a more explosive movement, which will see the DB being propelled up towards shoulder height as you drive the hips forwards and pull your elbow up towards the ceiling. At the top of the movement you may slightly leave the floor as your ankle, knee and hip all go into full extension. The DB will pause for a split second at the top of the movement but as soon as it wants to go back down towards the floor then reverse the movement and guide it back down safely and quietly to the start position.
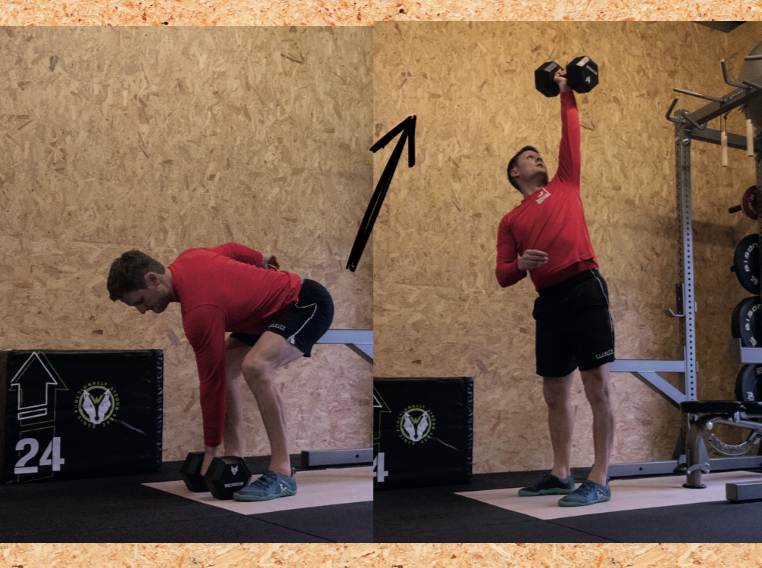
Stage three – Snatch, 10 reps each hand
Same start position as stage two, except this time, instead of driving your elbow up towards the ceiling and stopping you will now allow the DB to continue up towards the ceiling. As the DB passes your shoulder you should learn to drop under the weight slightly so as to reduce the distance the DB has to travel and also to absorb a bit of the force that has been generated. Eventually the Snatch will be a smooth movement from the floor to the ceiling (with the elbow locked out overhead) and the DB will stay nice and close to your body all the way up and down. Again, this is a very explosive movement, you cannot approach the snatch with anything less than 100% commitment. Do not take your eyes off the DB at any point of the movement.
Stage four – Overhead Squat, 8 reps each hand
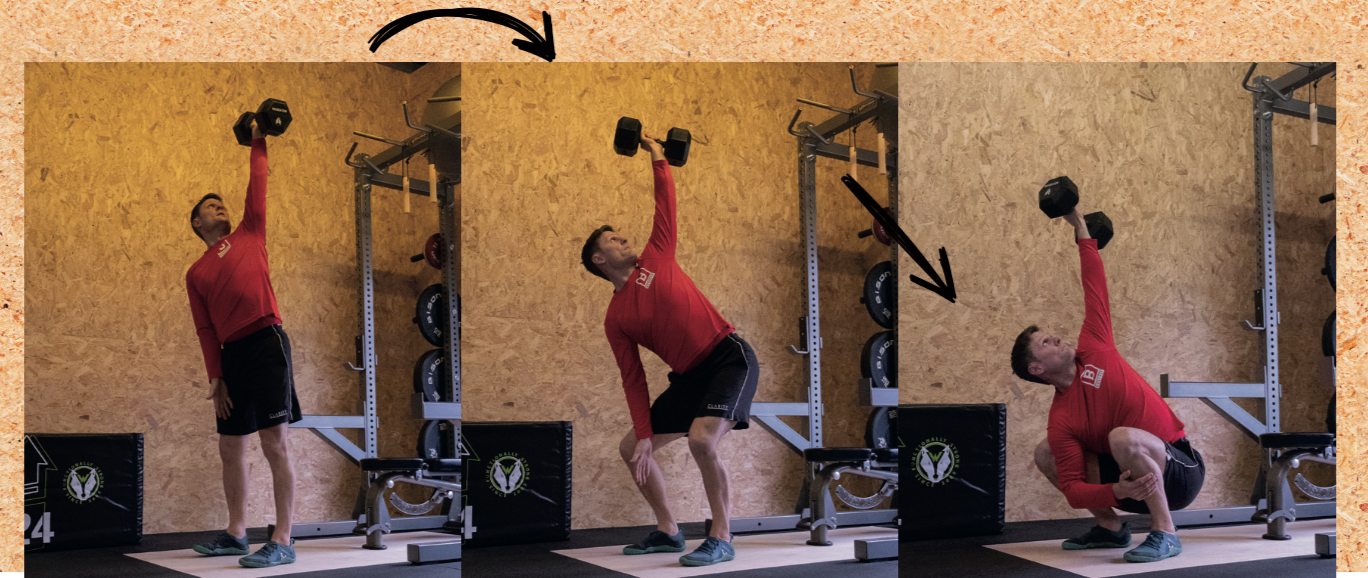
Snatch the DB up into an overhead position and keep your eyes fixed on it at all times. Place the back of your opposite hand onto your thigh (same thigh as the side of the hand), then ensure your heels are pushing down into the floor and slowly lower yourself down into a squat. As your body lowers down towards the floor allow your torso to turn towards the DB. This rotation of the torso will allow the DB to stay directly above your centre of mass and will see your body twist beneath the load. If the opposite hand cannot touch the floor without your heels lifting up then do some work on your ankle mobility, trunk strength and hamstring/glute flexibility, but in the short term you can reduce the depth of the squat accordingly. You will also need very good shoulder strength and mobility to be able to execute this movement well.
Stage five – Jerk/Push Press, 6 reps each hand
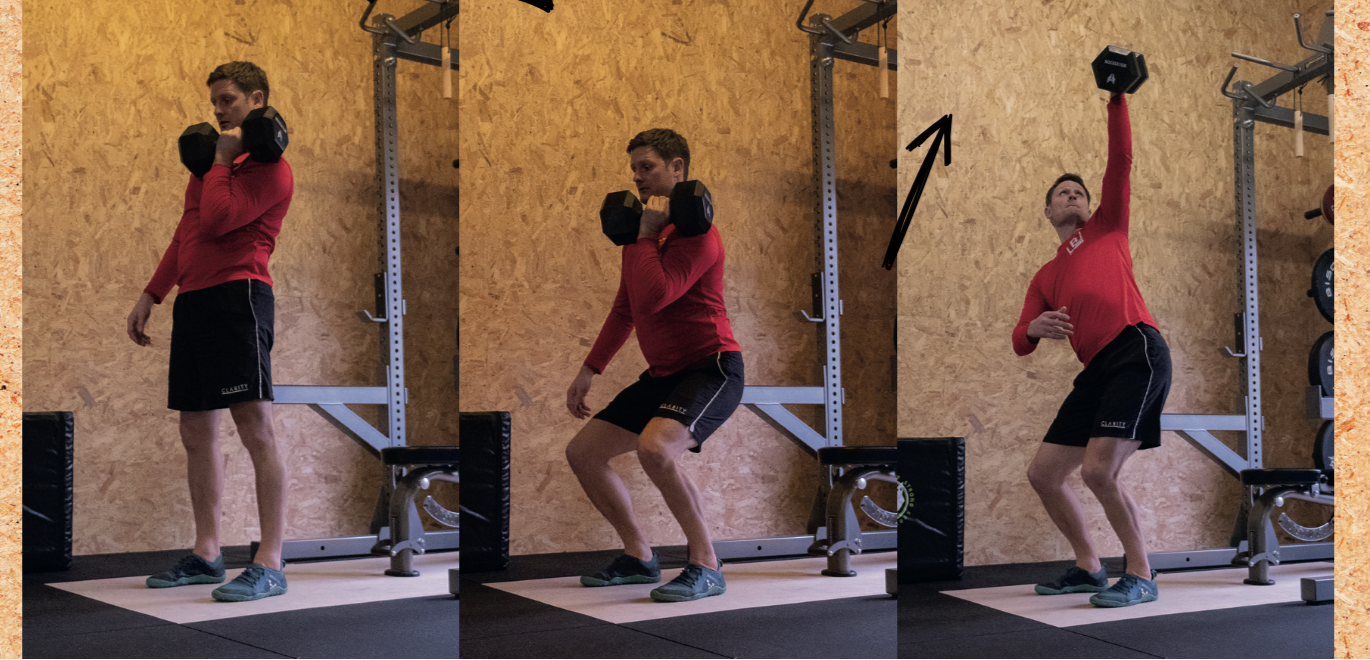
Snatch the DB up into an overhead position again, maintaining eye contact as always. For the jerk/push press you will lower the DB down to the rack position at shoulder height, then press it back up to the top position by using your legs to assist. A safe and solid rack position will see the palm of your hand facing towards your face, your fingers should be able to brush your chin and your elbow will be touching your ribs – learn to land in this position every single time. Keeping the elbow tight against your ribs, lower yourself down a few inches into a squat and then explosively drive the hips forward and press the DB up overhead. The push press is just one single dip of the knees. The jerk is a double dip of the knees (first dip as you lower down into a shallow squat, then you drive up out of the squat and as the DB passes the shoulder you then perform the second dip of the knees so you catch the DB in a squat position).
Stage six – Windmill, 4 reps each hand
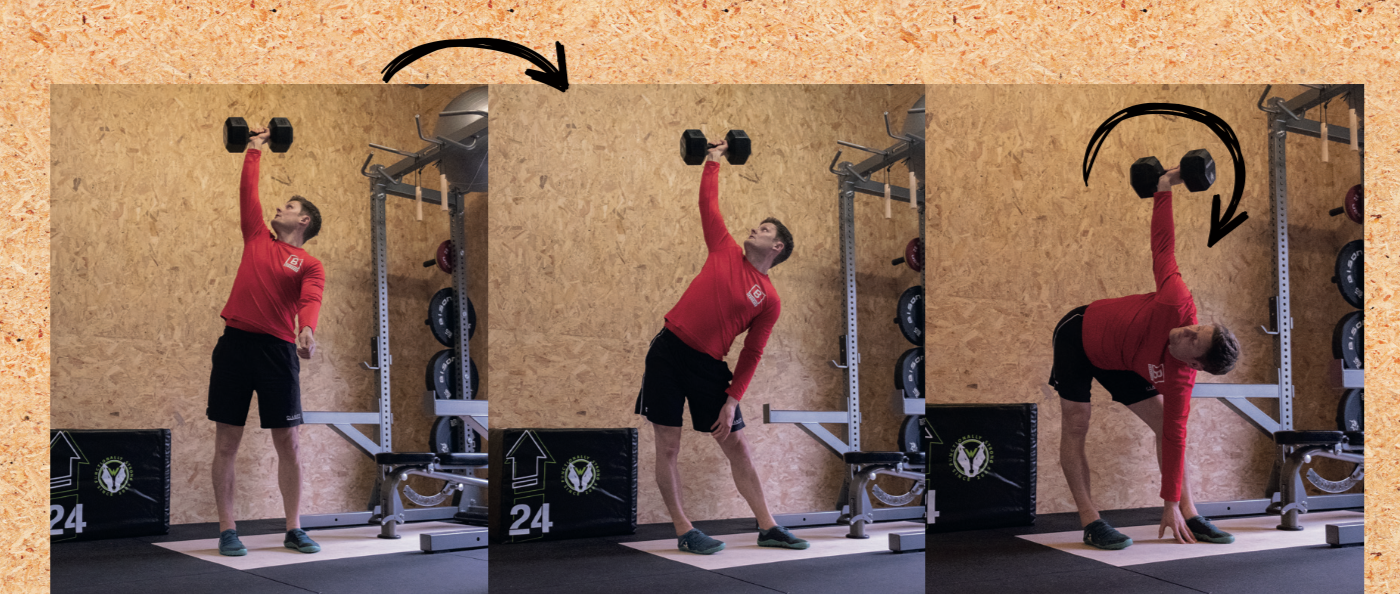
The start position is once again in the overhead position with the elbow locked. Once you are in this position and your eyes are looking at the DB, turn both feet diagonally away from the DB (eg if the DB is in your left hand and your feet are pointing to 12 o’clock then you will turn them towards 2 o’clock – the foot furthest away may want to turn a little further than the one nearest). Once your feet are in position then push your hips back away from your feet as far as you can, ensuring that you do not bend at the knee (we want to use the posterior chain as much as possible and bending at the knee will limit this). The back of the empty hand will be placed onto the thigh of the leg furthest away from the DB. As you push your hips back further this hand will slide down the length of your leg towards the floor, but all the while your elbow will be locked ensuring the DB stays overhead and of course the eyes do not lose sight of the DB at any time. Practise this movement with a very light load at first making sure your hips can move in the required fashion and that your hamstrings are suitably flexible.
Stage seven – Turkish Get Up, 2 reps each hand
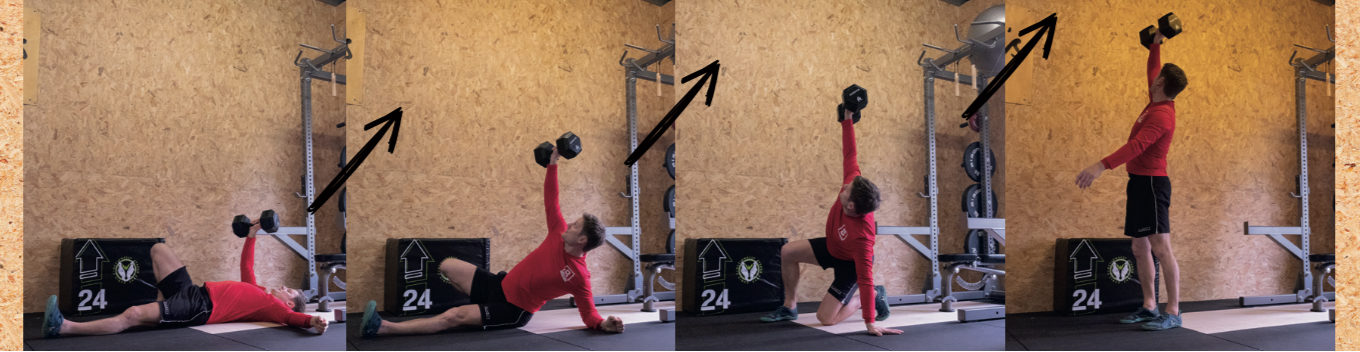
The start position is overhead once again so perform a snatch to get the DB into position one more time, then it is just the simple task of laying flat on your back and returning to the start position without unlocking the elbow and lowering the DB at any stage. The way down is quite simple, start off by balancing your shoe on the top of your fist. If the shoe is locked overhead on your left fist then step back into lunge so that the right knee touches the floor, then place your right hand on the floor, then take some weight on the hand so that you can swing your right leg out in front of you and place your right bum cheek onto the floor, then drop down on your right elbow, then slide the right elbow away from the body so that your right shoulder (followed by the entire back) is flat on the floor. Now you will be laying flat with your left knee pointing up to the ceiling, left hand with the DB also pointing at the ceiling and the right arm out straight away from the body at a 45-degree angle.
The trick to getting up, is to not try and get up. Instead, push your left heel and right elbow into the floor as hard as possible, simultaneously twisting your torso as if trying to push the DB up towards the ceiling. Then simply reverse the movement, up onto the right hand, then lift the right bum cheek and drag the right leg back behind you and get into a lunge, then drive up back into a standing position. Again, practise this movement with no weight/very light weight before attempting it with a heavy DB.
If you can perform this workout with one single DB that is 50% of your bodyweight then you will be extremely strong, robust and capable of performing pretty much anything that life throws at you with a minimal risk of injury. Plus you will be excellent at showing off too.
Good luck and let me know how you get on by contacting me at mark@marklaws.co.uk or @marklaws2011
Sponsor


FOLLOW BESTFIT